My home multi zone smart heating configuration with the use of Home Assistant
Date first published: July 1 2021
Latest modification: March 3 2022
By: Johan F.
1. Introduction
Home Assistant is Open Source software that runs on various devices, for instance Raspberry Pi, and acts as a central server for smart home devices and/or self build modules to make automatizations in the home. It has an active community and a large library of integrations with products on the market. Home Assistant is a non-cloud system, which means there is not necessarily a dependance on external cloud services and an internet connection.

Website Home Assistant: home-assistant.io
With the use of Home Assistant I created a multi zone smart thermostat, which I was able to customize to my personal situation. Against low costs, about $50, and all wired to limit the EMF radiation in the home. In this document I will describe my configuration.
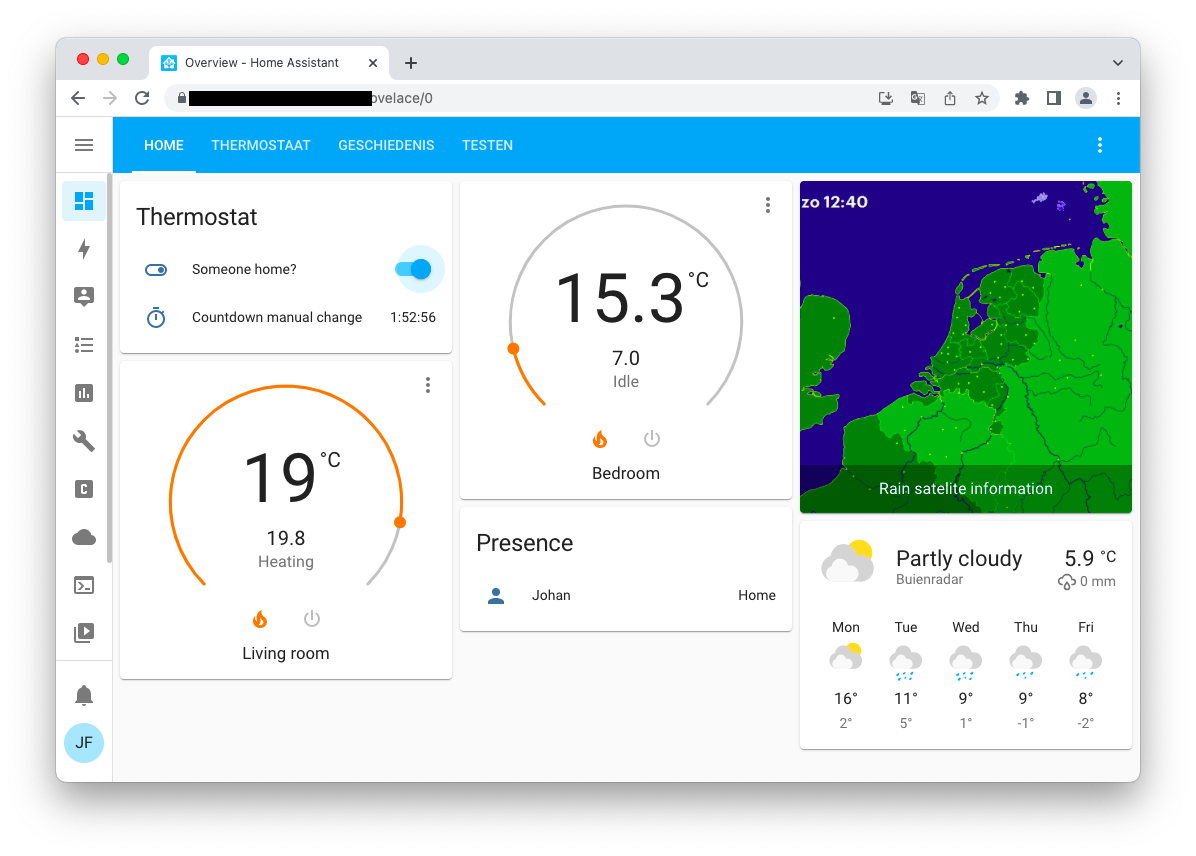
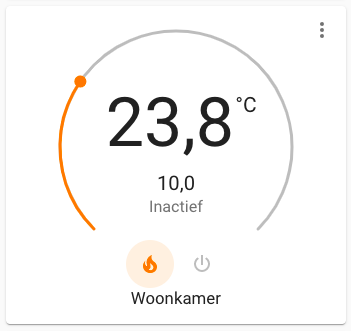
Screenshots of my dashboard:
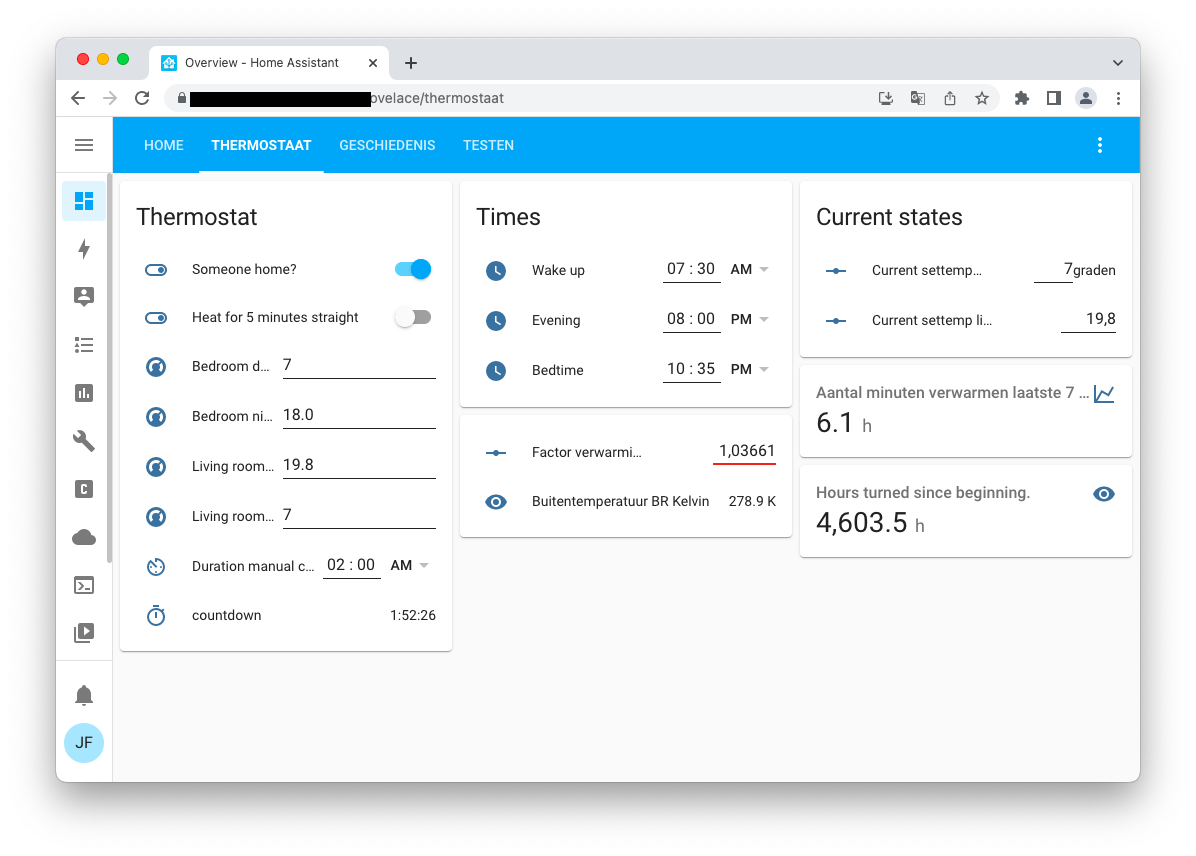
Here is a tab with variables:
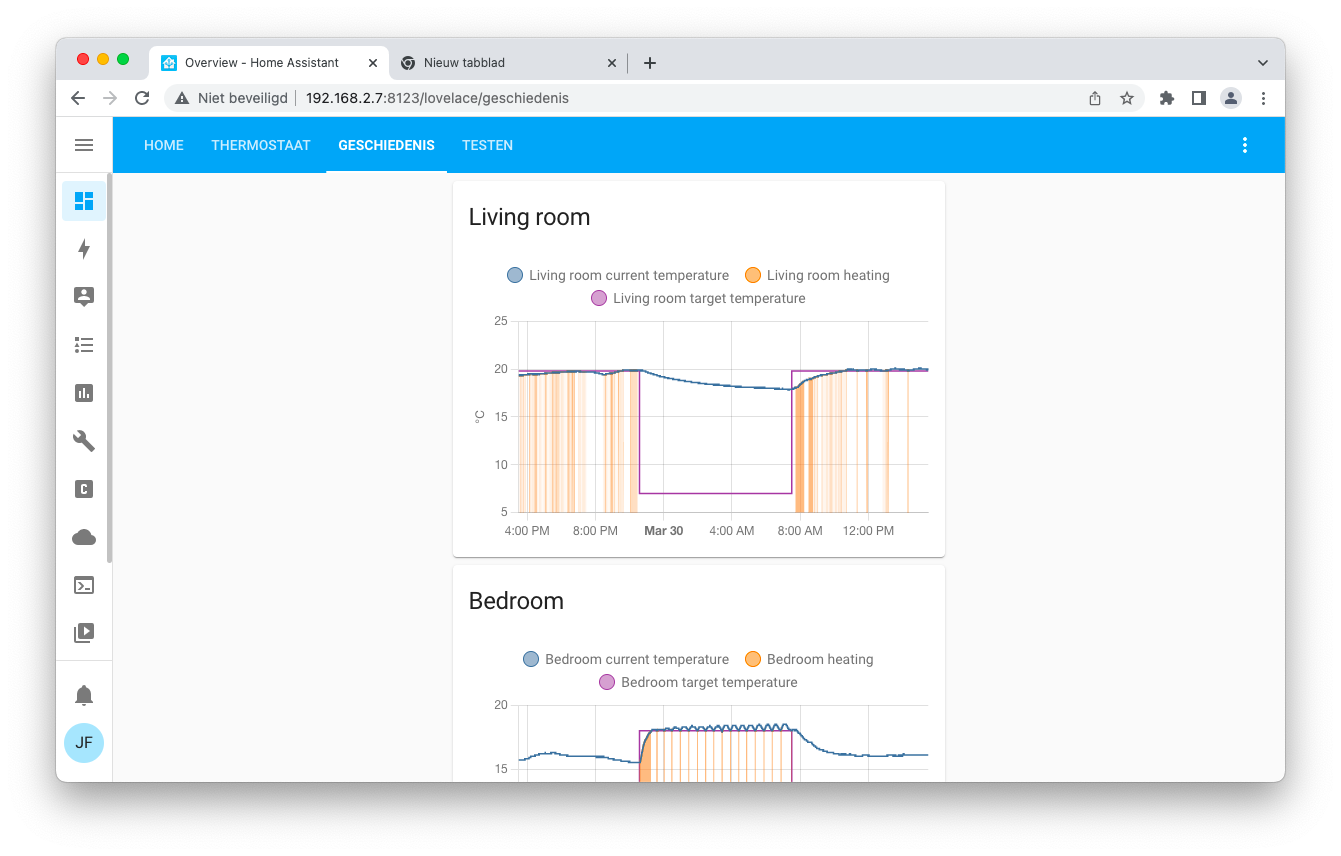
A tab with history:
And on my phone:

Table of contents
- 1. Introduction
- 2. Floor plan of my apartment
- 3. The design wishes for the system
- 4. Software
- 5. Hardware
- 6. Update 03/10/22 new hardware configuration
- 7. Home Assistant configuration
- 7.1 Helpers
- 7.2 Variables
- 7.3 Turning off wifi and bluetooth
- 7.4 Configuration.yaml
- 7.5 Setting temperature time program
- 7.6 Triggering heating with two generic thermostat entities
- 7.7 Presence detection
- 7.8 Heat for 5 minutes straight
- 7.9 Anti-frost measures
- 7.10 Window open detection
- 7.11 Revert back to programmed set temperature after manual change
- 7.12 Telegram notification hours of heating past week on Sunday
- 7.13 Turn off heating when there is no signal of DS18B20 temperature sensor
- 8. Bypass valve
- 9. Possible improvements to this configuration
- 10. Questions / contact
- 11. Other options for wired configurations
- 12. External links
2. Floor plan of my apartment
My appartement consists of a living room, a bedroom and a kitchen.

|
| A schematic view of the floor plan with the relevant rooms |
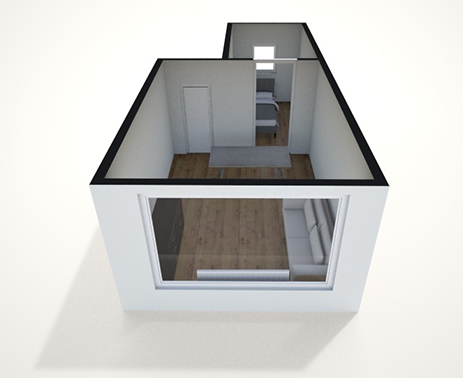 |
| A 3D view of the floorplan, the door between living room and bedroom can be closed off (made with https://roomstyler.com/3dplanner) |
The appartement has a boiler (Intergas kompakt hre 24/18) for central heating which can use a on-off control and OpenTherm.
 |
| Intergas hre 24/18 |
3. The design wishes for the system
- Multi zone: Heat the bedroom to a desired temperature at night (while living room radiator closed) and the living room during the day and evening (while bedroom radiator closed)
- Turn off the thermostat function when no one home
- A wired system, that doesn't use wifi, as it is more reliable and to limit the use of EMF-radiation in the home. See this TED talk about possible dangers of EMF radiation in the living environment.
- A smartphone app and / or a browser to control and monitor the thermostat
- Send alerts to the smartphone when certain conditions are met, e.g. when it is suspected that a window is open.
- Reverting to normal set temperature after a certain amount of time after a manual change
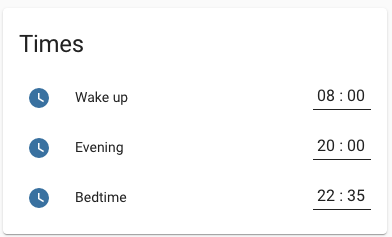
- Easily setting variables like bedtime, waking time and revert-to-initial-time with input fields in the front-end
4. Software
Home Assistant (The main platform on which everything is running)
Installation instructions for Home Assistant can be found on the Getting Started page of the Home Assistant website.
Download location Home-Assistant OS for Pi Zero W, used in this configuration, is not listed on the website but is available at: https://github.com/home-assistant/operating-system/releases for pi Zero W choose: hassos_rpi0-w-x.xx.img.xz.
Note: Since the release of HA OS 7.0 the Pi Zero isn't supported anymore. See this Github Pull request. The 6.6 version is still available for download. However it is uncertain how long the Home Assistant latest core will be running on this version 6. For running a future proof hardware configuration, the RPi3 or above seems to be a better choice.
Arduino IDE (for uploading Arduino sketches to the arduino mcu)
Home assistant integrations for the thermostat
Several integrations are used. The most important is the Generic Thermostat integration, designed to act as a on-off thermostat with a switch:
5. Hardware
Bedroom
Plastic container with a hole cut out with a 5 meter USB extension cable to the server.

In this container.
- Arduino nano with a DS18B20 temperature sensor connected via long USB cable (4 meter) to the Home Assistant server


Store: Aliexpress
An arduino sketch is flashed to the arduino nano. The output of this sketch will be sent to serial via USB. As an alternative to coding a sketch for a USB connected arduino(like) device, Firmata, can also be considered. With firmata it is easy to create a YAML file to add sensors and actuators and have them outputted to Home Assistant.
This setup uses a USB serial connection, which is suitable, as this is a small appartement, with just two rooms. For larger house there are other wired alternatives, see the Wired alternatives section.
Arduino sketch used:
#include <OneWire.h>
#include <DallasTemperature.h>

// Data wire is plugged into port 2 on the Arduino
#define ONE_WIRE_BUS 2

// Setup a oneWire instance to communicate with any OneWire devices (not just Maxim/Dallas temperature ICs)
OneWire oneWire(ONE_WIRE_BUS);

// Pass our oneWire reference to Dallas Temperature.
DallasTemperature sensors(&oneWire);

/*
   The setup function. We only start the sensors here
*/
void setup(void)
{
  // start serial port
  Serial.begin(9600);

  // Start up the library
  sensors.begin();
  sensors.setResolution(12);
}

/*
   Main function, get and show the temperature
*/
void loop(void)
{
  int numberOfDevices = sensors.getDeviceCount();
  if (numberOfDevices > 0) {
    sensors.requestTemperatures();
      }
      float t = sensors.getTempCByIndex(0);
      Serial.println(t);

  delay(30000);
}
Living room
Server with sensors:

Case: Aliexpress
PIR case (only used as case and fitted in 5V PIR): Aliexpress
Contains:
- Raspberry pi Zero W (acts as server) with:

- DS18B20 temperature sensor
Store: Aliexpress
Note: DHT11/22 sensors don't work with pi0 and Home Assistant (driver not provided), if desired use an Arduino with DHT sensor and connect to Home Assistant.
- PIR motion sensor module

Store: Aliexpress
There are two set screws on this module, one is for measure distance and one for sensitivity (how long the signal is high)
- Relay module with wire connected to boiler for controlling on-off heating

Store: Aliexpress
- USB hub with Ethernet and connected USB storage device for the OS.
Note: an SSD drive will give a higher expected lifetime than a USB or SD card, as these are known for their limited I/O read and write cycles. - MicroSD with bootcode.bin file (needed, as pi0 doesn't boot from USB by default)
Connnected together:

In casing:
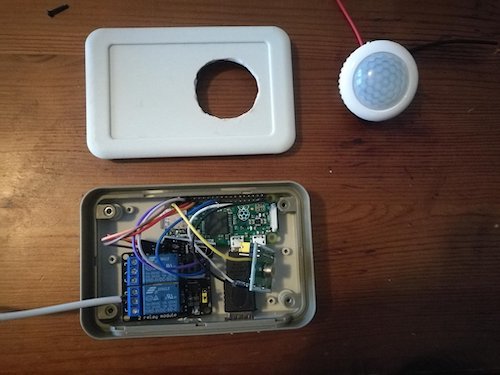
The casing is too small to fit al the parts, so the USB hub is connected outside the casing.
Note about the pi0
The pi Zero W is the Raspberry with the least powerful specifications. However, it does run well for a year now, as I only use it for nothing else than the thermostat function. The larger Raspberry pi boards have headers, the GPIO pins, soldered to to them. For Pi0 you can choose to buy a headerless of with header. I prefer the one already soldered, as it is only a couple of bucks more.
Download location Home-Assistant OS for pi0 at: https://github.com/home-assistant/operating-system/releases for pi Zero W choose: hassos_rpi0-w-x.xx.img.xz.
Note: Since the release of HA OS 7.0 the Pi Zero isn't supported anymore. See this Github Pull request. The 6.6 version is still available for download. However it is uncertain how long the Home Assistant latest core will be running on this version 6. For running a future proof hardware configuration, the RPi3 or above seems to be a better choice.
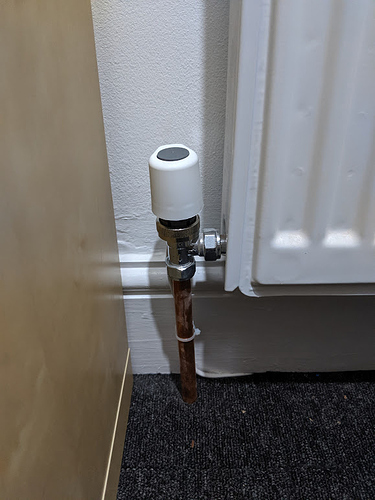
Thermostatic radiator valves
Both rooms have one radiator, each is equipped with an eqiva-N thermostatic radiator valve (TRV). These are only used to open and close the radiators at the beginning and end of the day. They are programmed to setpoint 12° C when the desired heating for the room is off and to 25° C when the desired heating is on.
Limitations
The limitation of using these TRVs is that they aren't being set from within Home Assistant, as I chose a TRV without connectivity. Therefore it is important to keep in mind that there is a risk that they aren't synced to the times set in Home Assistant, as their program needs to be set separately.
Another limitation is that when the set temperature of the bedroom during the day is set higher than the current room temperature, the boiler will start heating but no heat will arrive at the room, as the radiator is closed. Of course it is possible to open the valve manually.
 |
| The eqiva-N thermostatic radiator valve (TRV) |
Radiator valve before:
 |
| The Herz valve knob - old situation |
There were no thermostatic valves on my radiator (just a turn knob), to get it working with the Eqiva TRV I had to put in a new insert, part #1639091 for Herz radiator valves:
 |
| The Herz valve with the old insert removed with a drained system |
 |
| The Herz 1639091 insert to make the valve a thermostatic valve |
An extra adapter was necessary to fit the eqiva-N TRV as it doesn't fit the Herz system with the adapters provided on in the package.

|
| IMI adapter for Herz part no. 15071304 |
Doorsprings
A doorspring was put on both rooms door, so that they will be kept closed as much as possible to avoid heat loss.
 |
| Doorspring for door closing |
6. Update 03/10/22 new hardware configuration
I moved to a new apartment and had to install everything in the new situation. I made different choices for this new home, everything is still wired though. A ESPHome hub in the living room and bedroom. Both hubs are connected via Ethernet cables to the network.
Also different is the use of heating actuators instead of the Eqiva TRVs. Inspired by this topic on the Openhab forum. These heating actuators are now synced to Home Assistant, which was not the case with the Eqiva TRVs. Also added window open/close sensors.
 |
| Heating actuator, usually applied in underfloor heating, now applied in the new design |
Below is a schematic overview of this new situation. I am planning on updating this document with the automations used in the new situation.

April 2020:

Replaced the server Raspberry Pi zero with a Asus Chromebox second hand for €40. Flashed HaOS to a an SSD drive via USB with a USB to SATA connector and plugged this in the Chromebox.

7. Home Assistant configuration
7.1 Helpers
Created the following helpers via configuration > helpers within Home Assistant
| Type | Name: | |
|---|---|---|
| Someone home? | input_boolean (toggle) | input_boolean.presence |
| Go to bed time | input_datetime.bedtime | |
| Evening time | input_datetime.eveningtime | |
| Wake up time | input_datetime.wakuptime | |
| Set temperature living room night | input_text.livingroom_settemp_night | |
| Set temperature living room day | input_text.livingroom_settemp_day | |
| Current set temperature living room according to program | input_number.current_settemp_livingroom | |
| Countdown timer | timer | timer.countdown |
| Second to last movement recorded | input_datetime.movement_one_before_last | |
| Last movement recorded | input_datetime.movement_last | |
| Current set temperature living room according to program | input_number.current_settemp_bedroom | |
| Hours and minutes for a manual change in set temperature before reverting to program | input_datetime.duration_manual_temperature_change | |
| Heating toggle switch for bedroom (used in generic thermostat as heating switch) | input_boolean.switch_thermostat_bedroom | |
| Heating toggle switch for Living room (used in generic thermostat as heating switch) | input_boolean.switch_thermost_livingroom | |
| Set temperature living room night | input_text.bedroom_settemp_night | |
| Set temperature living room day | input_text.bedroom_settemp_day |
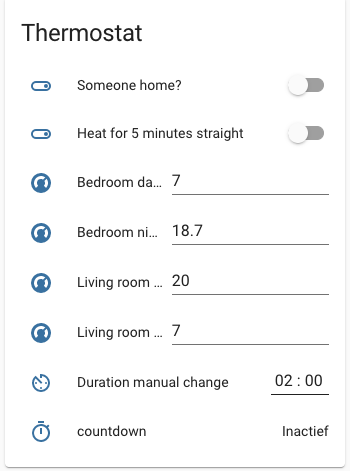
7.2 Variables
To easily change settings to which I would like them, I make use of input variables. I made a tab in Lovelace to edit this variables.
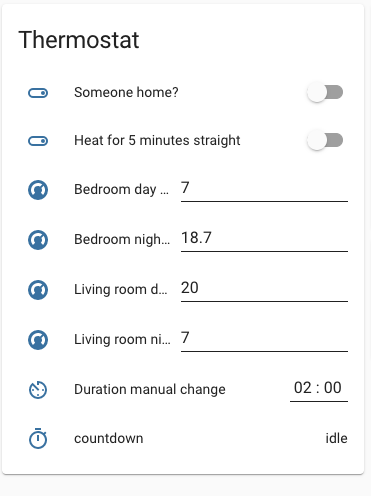
Most of them speak for themselves. The someone home switch is turned on depending on presence detection. When the set temperature of the thermostat is changed manually, it will revert back to the initial set temperature according to program after the set Duration manual change value. The countdown shows the amount of time left until revert to initial set temperature.
7.3 Turning off wifi and bluetooth
As it is one of the design wishes to have an all wired system to limit the amount of EMF radiation, bluetooth and wifi aren't used and turned off.
This is done by adding to boot/config.txt
dtoverlay=disable-wifi
dtoverlay=disable-bt
You can enter the config.txt file on Windows by reading out your SD card or USB drive on your computer and opening the boot partition. On Mac it is possible to mount the boot drive and read it out, see instructions here.
7.4 Configuration.yaml
Only covering the relevant part of the configuration for the smart heating system.
7.4.1 Setting up sensors and relay
7.4.1.1 Deprecation of Raspberry Pi GPIO read and write from Home Assistant
Note (february 20, 2020): From Home Assistant version 2022.6 the support of GPIO reading and output, will be deprecated. Background on this can be read in Architectural Decision Record 0019. As an alternative for GPIO support a HACS integration is available, ha-rpi_gpio. Other alternatives is using other connected microcontrollers and use the GPIO on those devices.
7.4.1.2 DS18b20 temperature sensor
To detect 1-wire temperature sensors on the Raspberry pi first add to your config.txt:
dtoverlay=w1-gpio,gpiopin=4
You can enter the config.txt file on Windows by reading out your SD card or USB drivee on your computer and opening the boot partition. On Mac it is possible to mount the boot drive and read it out, see instructions here.
After this, add the 1-wire integration via Settings / Integrations / Add integration

Restart Home Assistant and if configuration went well, a temperature sensor is detected and a name is assigned to it, similar to sensor.28_011937d1c3d1_temperature.
More on configuring 1-wire sensors on the Home Assistant documentation: 1-wire integration.
7.4.1.3 Correction of temperature sensor
My DS18B20 sensors (onewire) need a correction to match the right temperature value. With the use of template platform a correction is applied to the onewire sensors.
It is actually best to calibrate a temperature sensor, based on a one or two point reference value (like water/ice), but I didn't bother. For my home, it is important that I can set certain thresholds. Whether these are very accurate isn't really important. I just set temperatures that I experience as a pleasant temperature.
See below:
sensor:
  - platform: template
    sensors:
      ds18b20_woonkamer_correctie:
        value_template: "{{ states('sensor.28_00000913d350_temperature')|float - 1.2}}"
        friendly_name: 'Woonkamer temp'
        unit_of_measurement: degrees
7.4.1.4 Relay
Added to configuration.yaml
switch:
  - platform: rpi_gpio
    ports:
     5: Relay
More info on Home Assistant website: rpi_gpio integration
7.4.1.5 Motion sensor
Connected to gpio pin 26
binary_sensor:
  - platform: rpi_gpio
    invert_logic: false
    ports:
     26: Motion sensor
More info on Home Assistant website: rpi_gpio integration
After connecting set do desired behavior with the two set screws on the PIR module.
7.4.1.6 Arduino
First the sketch from the Hardware section was put on the Arduino nano, see the hardware section.
 - platform: serial
    serial_port: /dev/serial/by-id/usb-FTDI_FT232R_USB_UART_A1083GTG-if00-port0
On the Home Assistant documentation for Arduino integration it is described that serial_port: /dev/ttyUSB1 an be used. However, I noticed that on restarts the assignment of ttyUSB# can differ and therefore the readout of the Arduino can fail after restart. To make sure this doesn't happen the serial by-id is used. Which can be found in Supervisor - System - Click on the three dots in the Host block - Hardware
See below GIF:
7.4.2 Setup the generic thermostat integration
This integration adds the thermostat function and when configured makes available the thermostat function in Lovelace.
Home Assistant documentation: Generic thermostat
Choices for configuration variables:
target_tempI chose target temps within configuration.yaml lower than I actually want, cause with a sudden a reboot of the system I don't want the heating to turn on. I use automations to override the temperature to set these to desired temperatures. After a restart thetarget_tempis reverted back to the last setting before the reboot. See Automations further on.min_cycle_durationSet so that pump and gas furnace of boiler don't have to turn on and off that often. Set to 3 minutes for bedroom and 1 minute for living room. The living room has a larger radiator and 1 minute turned out as a good value. For the bedroom 3 minutes as the there is a smaller radiator.heaterI use twogeneric_thermostatinstances with separate heater switches, because Generic thermostat isn't able to work with multiple zones (described here) when one heater switch is on both rooms (they will contradict). For each room I used a Helper,input_booleanswitch. Trough an automation I made sure these helpers are controlling the relay switch, which controls the on-off signal to the boiler, see automations.
Part in Configuration.yaml
climate:
- platform: generic_thermostat
  name: Livingroom
  heater: input_boolean.switch_thermost_livingroom
  target_sensor: sensor.ds18b20_woonkamer_correctie
  min_temp: 12
  max_temp: 22
  ac_mode: false
  min_cycle_duration:
    minutes: 1
  target_temp: 18.0
  cold_tolerance: 0
  hot_tolerance: 0
  initial_hvac_mode: "heat"
  away_temp: 16
  precision: 0.1
- platform: generic_thermostat
  name: Bedroom
  heater: input_boolean.switch_thermostat_bedroom
  target_sensor: sensor.serial_sensor
  min_temp: 10
  max_temp: 22
  ac_mode: false
  min_cycle_duration:
    minutes: 3
  target_temp: 12.0
  cold_tolerance: 0
  hot_tolerance: 0
  initial_hvac_mode: "heat"
  away_temp: 16
  precision: 0.1
7.4.3 Telegram integration
I use Telegram for notifications. Currently I am using two notifications:
- Hours of heating during a week on Sunday at 18:00

Translation: "Last week there were 21 hours of heating"
- When the heating is automatically turned off because of a suspected open window (See Window open detection).

Translation: "Bedroom thermostat turned off bc of too slow heating up, window open?"
Home Assistant documentation: Telegram polling
telegram_bot:
  - platform: polling
    api_key: secret
    allowed_chat_ids:
      -  secret


notify:
  - platform: telegram
    name: Telegramnotifier
    chat_id: secret
7.4.4 Trend sensor for possible open window detection
Using the trend platform it is checked if the temperature will rise enough while heating. If not, it can be assumed that a window is open or some other error is happening and the heating is turned off. See automations.
The min_gradient value, which is the temperature rising per second, for each room is set based on trial and error.
  - platform: trend
    sensors:
      temp_falling_slaapkamer:
        entity_id: sensor.serial_sensor
        sample_duration: 150
        max_samples: 3
        min_gradient: 0.0003
        invert: false
        friendly_name: DeltaT slaapk voldoende
      temp_falling_woonkamer:
        entity_id: sensor.ds18b20_woonkamer_correctie
        sample_duration: 150
        max_samples: 3
        min_gradient: 0.0005
        invert: false
        friendly_name: DeltaT woonk voldoende
sensor:
  - platform: time_date
    display_options:
      - 'time'
      - 'date'
      - 'date_time'
  - platform: template
    sensors:
      deltat_slaapkamer:
        value_template: "{{state_attr('binary_sensor.temp_falling', 'gradient')|float * 1000}}"
        friendly_name: 'Slaapkamer temp gradient'
        unit_of_measurement: 'graden'
      deltat_slaapkamer_grens:
        value_template: "{{state_attr('binary_sensor.temp_falling', 'min_gradient')|float * 1000}}"
        friendly_name: 'Slaapkamer min gradient'
        unit_of_measurement: 'graden'
      deltat_woonkamer:
        value_template: "{{state_attr('binary_sensor.temp_falling_woonkamer', 'gradient')|float * 1000}}"
        friendly_name: 'Woonkamer temp gradient'
        unit_of_measurement: 'graden'
      deltat_woonkamer_grens:
        value_template: "{{state_attr('binary_sensor.temp_falling_woonkamer', 'min_gradient')|float * 1000}}"
        friendly_name: 'Woonkamer min gradient'
        unit_of_measurement: 'graden'
      heating_state:
        value_template: "{{state_attr('climate.woonkamer', 'hvac_action')}}"
        friendly_name: 'thermostaat state'
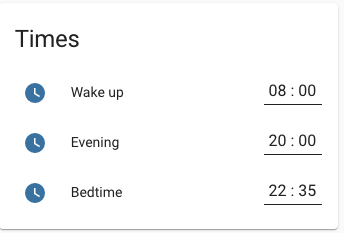
7.5 Setting temperature time program
Two automations per room, one for setting the desired set-temperature at bedtime and one at wake-up time. Also a helper input_number.current_settemp_bedroom is set with the current-set temperature. This is needed for restoring the set temperatures after restart of the system and after a manual change.
Uses below variables (screenshot from Lovelace dashboard)
I came across the HACS plugin Scheduler card, which provides a lot of features that would come in hand for the desired configuration. I am testing it out right now and it is quite feature rich and suitable for setting schedules. However, as it isn't a native integration within Home Assistant, it is possible that compatibility with Home Assistant will be lost in the future because of updates on Home Assistant. Therefore I chose to go with setting my own automations which are more reliable for the future.
Bedroom set temperature after bedtime
- id: '1587807892892'
  alias: Bedroom to settemperature at night
  description: ''
  trigger:
  - at: input_datetime.bedtime
    platform: time
  condition: []
  action:
  - data_template:
      entity_id: climate.slaapkamer
      temperature: '{{ states.input_text.bedroom_settemp_night.state }}'
    service: climate.set_temperature
  - service: input_number.set_value
    data:
      value: '{{ states.input_text.bedroom_settemp_night.state }}'
    entity_id: input_number.current_settemp_bedroom
  mode: single
Living room to set temperature on wake up time
- id: '1589611935632'
  alias: Livingroom set temperature at waking time
  description: ''
  trigger:
  - at: input_datetime.wakuptime
    platform: time
  condition: []
  action:
  - data_template:
      entity_id: climate.woonkamer
      temperature: '{{ states.input_text.livingroom_settemp_day.state }}'
    service: climate.set_temperature
  - service: input_number.set_value
    data:
      value: '{{ states.input_text.livingroom_settemp_day.state }}'
    entity_id: input_number.current_settemp_livingroom
  mode: single
Bedroom to set temperature on wake up time
- id: '1587807715263'
  alias: Bedroom to settempature on wake up time
  description: ''
  trigger:
  - at: input_datetime.wakuptime
    platform: time
  condition: []
  action:
  - data_template:
      entity_id: climate.slaapkamer
      temperature: '{{ states.input_text.bedroom_settemp_day.state }}'
    service: climate.set_temperature
  - service: input_number.set_value
    data:
      value: '{{ states.input_text.bedroom_settemp_day.state }}'
    entity_id: input_number.current_settemp_bedroom
  mode: single
Living room set temperature after bedtime
- id: '1587310221936'
  alias: Livingroom to set temperature at night
  description: ''
  trigger:
  - at: input_datetime.bedtime
    platform: time
  condition: []
  action:
  - data_template:
      entity_id: climate.woonkamer
      temperature: '{{ states.input_text.livingroom_settemp_night.state }}'
    service: climate.set_temperature
  - service: input_number.set_value
    data:
      value: '{{ states.input_text.livingroom_settemp_night.state }}'
    entity_id: input_number.current_settemp_livingroom
  mode: single
7.6 Triggering heating with two generic thermostat entities
As there are two zones in this situation, living room and bedroom, two thermostat instances are needed.
The generic thermostat integration is equipped to work only with one temperature sensor. You can run two instances of the generic thermostat integration. However when the heater option is set to the same switch, then when one thermostat is turned on, the other will automatically turn on too (bc they use the same switch, generic thermostat is programmed like that). This sometimes can lead to situations in which the thermostat of a room will turn on while cold air is flowing in because of a open window.
Therefore a couple of input_booleans are created and are set as heater switch. Via an automation the relay switch will be turned on if one of these input_booleans are turned on.
Also the someone status input_boolean.iemandthuis is taken into account
7.6.1 Turning on the thermostat when someone home
- id: '1587373774458'
  alias: Turn on thermostat when Someone home is set to on
  description: ''
  trigger:
  - entity_id: input_boolean.iemandthuis
    platform: state
    to: 'on'
  condition: []
  action:
  - data: {}
    entity_id: climate.woonkamer
    service: climate.turn_on
  - data: {}
    entity_id: climate.slaapkamer
    service: climate.turn_on
And a seperate for turning off when the state for Someone home is off.
- id: '1608318174333'
  alias: presenceheid uit
  description: ''
  trigger:
  - platform: state
    entity_id: input_boolean.iemandthuis
    to: 'off'
  condition: []
  action:
  - service: climate.turn_off
    data: {}
    entity_id: climate.slaapkamer
  - service: climate.turn_off
    data: {}
    entity_id: climate.woonkamer
  mode: single
7.6.2 Living room thermostat turn on
- id: '1606337912735'
  alias: Living room thermostaat on
  description: ''
  trigger:
  - platform: template
    value_template: '{{state_attr(''climate.woonkamer'', ''temperature'') > state_attr(''climate.woonkamer'',
      ''current_temperature'')}}'
  - platform: template
    value_template: '{{ (states.sensor.time.last_changed - states.input_boolean.iemandthuis.last_changed).total_seconds()
      > 5 }}

      '
  - platform: time_pattern
    minutes: '3'
  condition:
  - condition: template
    value_template: '{{state_attr(''climate.woonkamer'', ''temperature'')  > state_attr(''climate.woonkamer'',
      ''current_temperature'')}}'
  - condition: state
    entity_id: input_boolean.iemandthuis
    state: 'on'
  - condition: state
    entity_id: climate.woonkamer
    state: 'off'
  action:
  - service: climate.turn_on
    data: {}
    entity_id: climate.woonkamer
  mode: single
  max: 10
7.6.3 Living room turn thermostat off
- id: '1606839006446'
  alias: Woonkamer thermostaat uit
  description: ''
  trigger:
  - platform: template
    value_template: '{{state_attr(''climate.woonkamer'', ''temperature'') < state_attr(''climate.woonkamer'',
      ''current_temperature'')}}'
  - platform: time_pattern
    minutes: '2'
  condition:
  - condition: state
    entity_id: climate.woonkamer
    state: 'on'
  - condition: template
    value_template: '{{state_attr(''climate.woonkamer'', ''temperature'') < state_attr(''climate.woonkamer'',
      ''current_temperature'')}}'
  action:
  - service: climate.turn_off
    data: {}
    entity_id: climate.woonkamer
  mode: restart
  max: 10
7.6.4 Bedroom thermostat turn on / off
- id: '1606338268883'
  alias: 'Bedroom thermostaat on / off '
  description: ''
  trigger:
  - platform: template
    value_template: '{{state_attr(''climate.slaapkamer'', ''temperature'') > state_attr(''climate.slaapkamer'',
      ''current_temperature'')}}'
  - platform: time_pattern
    minutes: '3'
  - platform: template
    value_template: '

      {{ (states.sensor.time.last_changed - states.input_boolean.iemandthuis.last_changed).total_seconds()
      > 5 }}

      '
  condition:
  - condition: template
    value_template: '{{state_attr(''climate.slaapkamer'', ''temperature'') > state_attr(''climate.slaapkamer'',
      ''current_temperature'')}}'
  - condition: state
    entity_id: input_boolean.iemandthuis
    state: 'on'
  action:
  - service: climate.turn_on
    data: {}
    entity_id: climate.slaapkamer
  - wait_for_trigger:
    - platform: template
      value_template: '{{state_attr(''climate.slaapkamer'', ''temperature'') < state_attr(''climate.slaapkamer'',
        ''current_temperature'')}}'
  - service: climate.turn_off
    data: {}
    entity_id: climate.slaapkamer
  mode: restart
7.6.5 Enabling heating switch to boiler based when room heat switch turns on
As a room is asking for a heat, the corresponding input_boolean switch is turned by the thermostat. This automations takes care of turning on the relay switch sending the heating signal to the heater.
- id: '1608298248187'
  alias: Enabling heating switch to boiler based when room heat switch turns on
  description: ''
  trigger:
  - platform: state
    entity_id: input_boolean.switch_thermostat_bedroom
    to: 'on'
  - platform: state
    entity_id: input_boolean.switch_thermost_livingroom
    to: 'on'
  condition: []
  action:
  - service: switch.turn_on
    data: {}
    entity_id: switch.relay
  mode: single
 {% raw %}
7.6.6 Turning off the heating switch when both input_booleans for the rooms are off
The opposite of the previous automation. When there is no heating demand by the thermostats, both input_booleans for bedroom and livingroom are off and the relay switch to the heater will go off.
{% raw %}
- id: '1608298257006'
  alias: Helper schakelaars UIT klimaat
  description: ''
  trigger:
  - platform: time_pattern
    seconds: '5'
  - platform: state
    entity_id: input_boolean.switch_thermostat_bedroom
    to: 'off'
  - platform: state
    entity_id: input_boolean.switch_thermost_livingroom
    to: 'off'
  condition:
  - condition: state
    entity_id: input_boolean.switch_thermostat_bedroom
    state: 'off'
  - condition: state
    entity_id: input_boolean.switch_thermost_livingroom
    state: 'off'
  action:
  - service: switch.turn_off
    data: {}
    entity_id: switch.relay
  mode: single
- id: '1608318082068'
  alias: presenceheid aan
  description: ''
  trigger:
  - platform: state
    entity_id: input_boolean.iemandthuis
    to: 'on'
  condition: []
  action:
  - service: climate.turn_on
    data: {}
    entity_id: climate.slaapkamer
  - service: climate.turn_on
    data: {}
    entity_id: climate.woonkamer
  mode: single
- id: '1608318195860'
  alias: presenceheid uit
  description: ''
  trigger:
  - platform: state
    entity_id: input_boolean.iemandthuis
    to: 'off'
  condition: []
  action:
  - service: climate.turn_off
    data: {}
    entity_id: climate.slaapkamer
  - service: climate.turn_off
    data: {}
    entity_id: climate.woonkamer
  mode: single
7.7 Presence detection
Presence detection is done with both the mobile phone GPS location and a PIR movement sensor in the living room. If the mobile phone was the only source for presence detection this would have been used, but since there is a PIR as well, the away modus of Generic thermostat integration isn't used in this configuration, instead of this a helper switch input (Someone home?).
I used a PIR sensor next to the smartphone, because there are some disadvantages in using smartphones only for presence detection. There are scenarios like when the battery is down or the phone is on flight mode, in which the system will think someone is home. Also it is less suitable when having guests if the smartphone is used as only presence detection source.
The configuration is set so, that when the phone device_tracker.pra_lx1 changes location from away to home or home to away the helper switch input_boolean.iemandthuis is toggled. So only on state change, not on current state. Next to that, the rule is followed that if two movements aren't being detected within the last half hour, the ‘someone home status' input_boolean.iemandthuis is set to off.
In the evening the presence detection by the PIR motion detector should be different. It is assumed that if two times a motion is detected within half an hour during evening time and bedtime, that someone will be home during the entire night.
As it was noticed that the PIR used in very few occasions can have a false motion detection, the number of two motion detections was chosen.
This configuration set up is based on a one person household, so only one smartphone with the home assistant app running.
| Triggers | Between hours | set ‘someone home status' to |
|---|---|---|
| Two times a motion detected within 30 minutes period ‘someone home status' is off | waking up and evening | on |
| An half an hour with one or less motion detected while ‘someone home status' is on | waking up and evening | off |
| Two times a motion detected within 30 minutes period while ‘someone home status' is off | evening and bedtime | on |
| Smartphone location state change to away | always | off |
| Smartphone location state change to home | always | on |
The following automations were set to achieve this.
7.7.1 Automations for presence detection
Creation of input_datetime fields
Two input_datetime fields have been created for the purpose of presence detection: input_datetime.movement_last and input_datetime.movement_one_before_last . On a motion detection one is to date/time of the last movement detected and on the next detected motion this value is passed to the other.
This is used, bc it is desired that a minimum of two movements need to be detected in the last 30 minutes to keep the status of some one home, input_boolean.iemandthuis, to ‘on'.
Setting the movement input_datetime fields on motion detection
- id: '1606672315270'
  alias: Movementsensor last
  description: ''
  trigger:
  - platform: state
    entity_id: binary_sensor.motion_sensor
    to: 'on'
  condition: []
  action:
  - service: input_datetime.set_datetime
    data:
      datetime: '{{states(''input_datetime.movement_last'')}}'
    entity_id: input_datetime.movement_one_before_last
  - service: input_datetime.set_datetime
    data:
      datetime: '{{ now().strftime(''%Y-%m-%d %H:%M:%S'') }}'
    entity_id: input_datetime.movement_last
  mode: single
Turning of if not more than 1 movement detected during day
Timespan: between wake-up time and evening time
Description: Turn off the Someone home status input_boolean.iemandthuis when not more than 1 movement.
- id: '1587319961411'
  alias: Gedrag bewegingssensor woonkamer tussen wakuptime en eveningtime (overdag)
  description: ''
  trigger:
  - platform: template
    value_template: '{{ (states.sensor.time.last_changed - states.input_datetime.movement_one_before_last.last_changed).total_seconds()
      > 1800 }}

      '
  - platform: state
    entity_id: person.johan
    to: not_home
  condition:
  - condition: state
    entity_id: input_boolean.iemandthuis
    state: 'on'
  - before: input_datetime.eveningtime
    condition: time
    after: input_datetime.wakuptime
  action:
  - data: {}
    entity_id: input_boolean.iemandthuis
    service: input_boolean.turn_off
  mode: single
7.7.2 Reset the one-before-last-input boolean 31 minutes before waking time
Needed for the someone home status to turn on immediately when entering the living room in the morning, otherwise first two motions need to be detected, which can take a while.
- id: '1606905142912'
  alias: Reset 1 na laatste beweging 31 min voor wakuptime
  description: ''
  trigger:
  - platform: time_pattern
    seconds: '30'
  condition:
  - condition: template
    value_template: '{/% set current_time = now().hour * 60 + now().minute %}

      {/% set wakuptime_hour, wakuptime_minute, wakuptime_second = states(''input_datetime.wakuptime'').split('':'')
      %}

      {/% set wakuptime_time = wakuptime_hour | int * 60 + wakuptime_minute | int %}

      {{ current_time == wakuptime_time - 32 }}'
  action:
  - service: input_datetime.set_datetime
    data:
      datetime: '{{now().strftime(''%Y-%m-%d %H:%M:%S'')}}'
    entity_id: input_datetime.movement_one_before_last
  mode: restart
7.7.3 Automation to turn on someone home status
- id: '1587319960331'
  alias: Turn on someone home status
  description: ''
  trigger:
  - entity_id: device_tracker.pra_lx1
    platform: state
    to: home
  - entity_id: binary_sensor.motion_sensor
    platform: state
    to: 'on'
  condition:
  - condition: state
    entity_id: input_boolean.iemandthuis
    state: 'off'
  action:
  - data: {}
    entity_id: input_boolean.iemandthuis
    service: input_boolean.turn_on
  mode: single
7.7.4 Automation presence detection during evening and getting up
- id: '1587404974211'
  alias: presenceheid detectie eveningtime tot wakuptime
  description: ''
  trigger:
  - platform: template
    value_template: '{{ (states.sensor.time.last_changed - states.input_datetime.movement_one_before_last.last_changed).total_seconds()
      == 300 }}'
  condition:
  - condition: state
    entity_id: input_boolean.iemandthuis
    state: 'off'
  - before: input_datetime.wakuptime
    condition: time
    after: input_datetime.eveningtime
  - condition: template
    value_template: '{{ (states.sensor.time.last_changed - states.input_datetime.movement_one_before_last.last_changed).total_seconds()
      < 300 }}'
  action:
  - data: {}
    entity_id: input_boolean.iemandthuis
    service: input_boolean.turn_on
  mode: single
7.7.5 Turn off someone home status at wakeup
If home status was on during night it should turn of at waking time in case I wake up later than usual or leave house earlier.
- id: '1608290218329'
  alias: Bij wakuptime presenceheid uit
  description: ''
  trigger:
  - platform: time
    at: input_datetime.wakuptime
  condition: []
  action:
  - service: input_boolean.turn_off
    data: {}
    entity_id: input_boolean.iemandthuis
  mode: single
7.7.6 Automation between waking up time and evening time
- id: '1587319961411'
  alias: Behaviour of motion sensor living room between wakeup time and evening time
  description: ''
  trigger:
  - platform: template
    value_template: '{{ (states.sensor.time.last_changed - states.input_datetime.movement_one_before_last.last_changed).total_seconds()
      > 1800 }}

      '
  - platform: state
    entity_id: person.johan
    to: not_home
  condition:
  - condition: state
    entity_id: input_boolean.iemandthuis
    state: 'on'
  - before: input_datetime.bedtime
    condition: time
    after: input_datetime.wakuptime
  action:
  - data: {}
    entity_id: input_boolean.iemandthuis
    service: input_boolean.turn_off
  mode: single
7.7.7 Behavior based on smart phone location with Home Assistant app
- id: '1606221709908'
  alias: Smartphone thuiskomen / weggaan
  description: ''
  trigger:
  - platform: state
    entity_id: person.johan
    to: not_home
  condition: []
  action:
  - service: input_boolean.turn_off
    data: {}
    entity_id: input_boolean.iemandthuis
  - wait_for_trigger:
    - platform: state
      entity_id: person.johan
      to: home
  - service: input_boolean.turn_on
    data: {}
    entity_id: input_boolean.iemandthuis
  mode: restart
7.7.8 Turning off thermostat when Someone home status is off
- id: '1587373899805'
  alias: Thermostaat uit bij niemand thuis
  description: ''
  trigger:
  - entity_id: input_boolean.iemandthuis
    platform: state
    to: 'off'
  condition: []
  action:
  - data: {}
    entity_id: climate.woonkamer
    service: climate.turn_off
  - data: {}
    entity_id: climate.slaapkamer
    service: climate.turn_off
7.8 Heat for 5 minutes straight
Automation:
- id: '1588717917351'
  alias: 5 minuten verwarmen als schakelaar aan
  description: ''
  trigger:
  - entity_id: input_boolean.30_min_verwarmen_schakelaar
    platform: state
    to: 'on'
  condition: []
  action:
  - data: {}
    entity_id: switch.relay
    service: switch.turn_on
  - timeout: 00:05
    wait_template: ''
  - data: {}
    entity_id: switch.relay
    service: switch.turn_off
  - service: input_boolean.turn_off
    data: {}
    entity_id: input_boolean.30_min_verwarmen_schakelaar
  mode: single
7.9 Anti-frost measures
When there isn't anyone present in the house and the outside temperature is far below zero, the temperature in house can reach very low temperatures. This can cause heating pipes to freeze and break, which will leak when the water melts again and can cause flooding. With this automation the thermostat wil turn on, when the temperature in the bedroom reaches a value below 5 degrees..
Automation:
alias: Beveiliging vriezen
description: ''
trigger:
  - platform: time_pattern
    minutes: '5'
condition:
  - condition: numeric_state
    entity_id: climate.slaapkamer
    attribute: current_temperature
    below: '5'
action:
  - service: climate.set_temperature
    data:
      temperature: 5
    entity_id: climate.slaapkamer
  - service: input_boolean.turn_on
    data: {}
    entity_id: input_boolean.iemandthuis
  - service: climate.set_temperature
    data:
      temperature: 5
    entity_id: climate.woonkamer
  - service: climate.turn_on
    data: {}
    entity_id: climate.slaapkamer
  - wait_template: ''
    timeout: '300'
  - service: climate.turn_off
    data: {}
    entity_id: climate.slaapkamer
  - service: input_boolean.turn_off
    data: {}
    entity_id: input_boolean.iemandthuis
mode: single
7.10 Window open detection
There are no window sensors, but this is based on the temperature rise during heating. If the temperature doesn't rise quickly enough, it is assumed that a window is open and thermostat function will turn off.
Uses the Trend sensor to make the binary_sensor.temp_falling
After 300 seconds of heating without reaching the threshold of de trend sensor, the thermostat is turned off and sends a Telegram notification:
Translation: "Bedroom thermostat turned off bc of too slow heating up, window open?"
Automations:
For the bedroom:
- id: '1588799650928'
  alias: Relay beveiging raam open
  description: ''
  trigger:
  - platform: time_pattern
    minutes: '5'
  condition:
  - condition: state
    entity_id: binary_sensor.temp_falling
    state: 'off'
  - condition: template
    value_template: '{{state_attr(''climate.slaapkamer'', ''temperature'') | float
      > state_attr(''climate.slaapkamer'', ''current_temperature'')}}'
  - condition: state
    entity_id: switch.relay
    state: 'on'
  - condition: template
    value_template: '{{ (states.sensor.time.last_changed  - states.switch.relay.last_changed).total_seconds()
      > 310 }}'
  action:
  - service: telegram_bot.send_message
    data:
      message: Slaapkamer thermostaat uitgeschakeld ivm te langzame opwarming, raam
        open?
      target: [chat-number]
  - data: {}
    entity_id: climate.slaapkamer
    service: climate.turn_off
  - delay: 00:45:00
  - service: climate.turn_on
    data: {}
    entity_id: climate.slaapkamer
  mode: single
And for the living room:
- id: '1601215001454'
  alias: Relay beveiging raam open (woonkamer)
  description: ''
  trigger:
  - platform: template
    value_template: '{{ (states.sensor.time.last_changed  - states.switch.relay.last_changed).total_seconds()
      > 400 }}'
  condition:
  - condition: state
    entity_id: automation.slaapkamer_overgang_off_on_set_schakelaar
    state: 'on'
  action:
  - data: {}
    entity_id: climate.woonkamer
    service: climate.turn_off
  - delay: 00:59:00
  - service: climate.turn_on
    data: {}
    entity_id: climate.woonkamer
  mode: single
7.11 Revert back to programmed set temperature after manual change
According to input_datetime.duration_manual_temperature_change value a timer is started after which the set temperature will revert back to set temperature according to program.
Uses the Timer integration
- id: '1604920070266'
  alias: Countdown bij manual wijziging
  description: ''
  trigger:
  - platform: state
    entity_id: climate.slaapkamer
    attribute: temperature
  - platform: state
    entity_id: climate.woonkamer
    attribute: temperature
  condition: []
  action:
  - service: timer.start
    data:
      duration: '{{ states.input_datetime.duration_manual_temperature_change.state }}'
    entity_id: timer.countdown
  - delay: '{{ states.input_datetime.duration_manual_temperature_change.state }}'
  - service: climate.set_temperature
    data:
      temperature: '{{ states.input_number.current_settemp_bedroom.state  }}'
    entity_id: climate.slaapkamer
  - service: climate.set_temperature
    data:
      temperature: '{{ states.input_number.current_settemp_livingroom.state  }}'
    entity_id: climate.woonkamer
  mode: restart
7.12 Telegram notification hours of heating past week on Sunday
- id: '1604938488226'
  alias: Notificatie aantal uren verwarmen in week
  description: ''
  trigger:
  - platform: time
    at: '18:00'
  condition:
  - condition: time
    weekday:
    - sun
  action:
  - service: telegram_bot.send_message
    data:
      message: De afgelopen week is er {{ states.sensor.aantal_minuten_verwarmen_laatste_7_dagen.state
        | int}} uren verwarmd.
  mode: single
7.13 Turn off heating when there is no signal of DS18B20 temperature sensor
It occasionally happens that there is no signal of the DS18B20 temperature sensor or that by mistake the USB cable gets unplugged. The displayed temperature then can get below set temperature and will trigger heating while not really desired. To avoid this an automation is set to turn off.
- id: '1606221459609'
  alias: Beveiliging uitvallen temp sensor
  description: ''
  trigger:
  - platform: numeric_state
    entity_id: climate.slaapkamer
    attribute: current_temperature
    below: '10'
  - platform: numeric_state
    entity_id: sensor.ds18b20_woonkamer_correctie
    below: '10'
  condition: []
  action:
  - service: climate.turn_off
    data: {}
    entity_id: climate.slaapkamer
  - service: climate.turn_off
    data: {}
    entity_id: climate.woonkamer
  mode: single
8. Bypass valve
When using zone heating in your house, consider adding a bypass valve to your central heating plan. A bypass valve will let through water when the pressure in the system gets too high. This avoid damage to the boiler pump because of pumping while all the radiators are closed you can open a small radiator manually or add a bypass valve. I just keep a radiator in my shower always opened.

9. Possible improvements to this configuration
Some possible improvements for this design to implement later on:
- Making a way to control the radiator valves within Home Assistant. As a wired solution is preferred, a possibility is using a zone valve (quite expensive) or a heating actuator. A heating actuator is usually used for floor heating distribution, but might also be suitable for a radiator. Also an interesting and cost effective way is presented here: Hacking a Eqiva EQ-3 thermostatic radiator valve.
- Making use of OpenTherm. The OpenTherm module made by Ihor Melnyk is suitable for doing that. Already been fiddling around with this idea, see my community post.
- Omit the use of a arduino by using long cables for a DS18B20 temperature sensor. I later learned that onewire sensors can work with very long cables. This cuts away the need for using an arduino here.
- Making more input variables. I can probably do some more of these for instance setting the time the someone home status is turned of when no motion detection. Setting variables helps for not having to open the automations every time.
- Using thermal sensors for presence detection with for instance the Omron D6T sensors, youtube link.
9.1 Added to the system but not described yet
- Set a variable time of heating according to the outdoor temperature fetched from an internet source
10. Questions / contact
Easiest way is to post a message in this topic on the Home Assistant community forum.
11. Other options for wired configurations
Reasons to choose for a wired configuration instead of wireless are:
- Reliability
A hard wired connection has better reliability because wireless networks can be troublesome with long distance, objects in the house, a (wifi) band that is being used by other devices etcetera. - Security
A wireless network can be disturbed by external action, taking down its functionality. Something that is important with house security like alarms and camera's. - No EMF radiation
Something I personally also do take in account. With the number of wireless communicating devices that are adding up in current days, the levels of EMF radiation in the home can get quite high.
The above described configuration uses a USB cable connection to an arduino to my bedroom. This is convenient as it both powers and readouts the arduino. For other, larger houses with multiple temperature sensors and zones this will not be an option, as it's not suitable for long distances.
11.1 Other wired options:
- a long cable to a 1-wire ds18b20 sensor.
This is something that could have been done in this configuration too, but wasn't considered. 1-Wire sensors are capable to have quite a distance. - Ethernet wires to ESP32 microcontrollers with ethernet
Among other options, the ESPHome platform can be used by using an Olimex POE device or a Wt32-eth01. Entities from these devices will be available in Home Assistant, when they are connected to the network Home Assistant is running on.
 |
| The Olimex-poe-iso, ESP32 device with Ethernet connection |
- Arduino with an ethernet module, like the W5500, with MQTT sending/receiving
Cheaper hardware, but more work to be done for the configuration - Modbus
An older but also available protocol for sending data trough two wired cables. Can be convenient to use with existing cables running trough a home.
Power over Ethernet (PoE)
Power over Ethernet can be very convenient in a wired configuration. PoE devices are providing both power and a data connection through one cable. This dismisses the need for adding power to the device by an extra power source. PoE is not available on all Ethernet connections, a PoE router or switch is needed.
12. External links
Home Assistant community forum
I used these webpages for inspiration:
A tutorial: Siytek - the ultimate home-assistant DIY guide for multiple zone heating
A nice project by Davide Perini which also uses a PIR motion detector and has a 3D printed case and a LCD screen: github.com/sblantipodi/smart_thermostat
Other links to similar:
Hacking a Eqiva EQ-3 thermostatic radiator valve.
An interesting idea: using Omron D6T thermal sensors as room presence detection
Opentherm module by Ihor Melnyk
MQTT PoE radiator valves on the Home Assistant community forum
For underfloor heating systems a wired solution is "off the shelve system" is the Homematic underfloor heating system.
Scheduler plugin for HACS, the add-on library for add-ons not in the official add-on store.
An interesting idea is to use heating actuators on the radiator controlled by relays. These actuators are actually designed for floor heating manifolds. This topic on the Openhab forum discusses this option.
Below a photo from that topic.
Another project: Orientation on measuring and controlling in the vegetable garden using sensors